
Reverse Osmosis Tank Not Filling? 5 Common Causes & Fixes for 2026
You reach for your faucet expecting a refreshing stream of purified water, but only a weak trickle appears. It’s a frustrating moment. When you notice your reverse osmosis tank not filling, it’s natural to worry about high repair costs or a total system failure. You shouldn’t have to settle for basic tap water or the environmental waste of plastic bottles when you’ve already invested in your family’s well-being.
We agree that having reliable, crystal-clear water is a non-negotiable part of a modern, healthy home. The good news is that a dry tank rarely means your equipment is broken. This guide will show you how to diagnose the issue and restore your supply of pure water. We’ll explore five common causes, including pressure imbalances and filter life, so you can decide when to DIY and when to call the experts at A Clear Alternative for a professional touch.
Key Takeaways
- Start with simple physical checks, such as verifying the feed water valve is open and ensuring no plastic tubing is kinked under your sink.
- Learn why incorrect air pressure is the most frequent reason for a reverse osmosis tank not filling and how to calibrate your tank for peak performance.
- Understand how local South Jersey water conditions, particularly high iron and sulfur, can clog your filters and membrane faster than standard timelines suggest.
- Identify malfunctioning auto shut-off valves that may be tricking your system into staying off even when your storage tank is completely empty.
- Gain the confidence to perform basic maintenance yourself while knowing exactly when to call for professional support to protect your home’s water quality.
Quick Checks: Is Water Reaching Your Reverse Osmosis System?
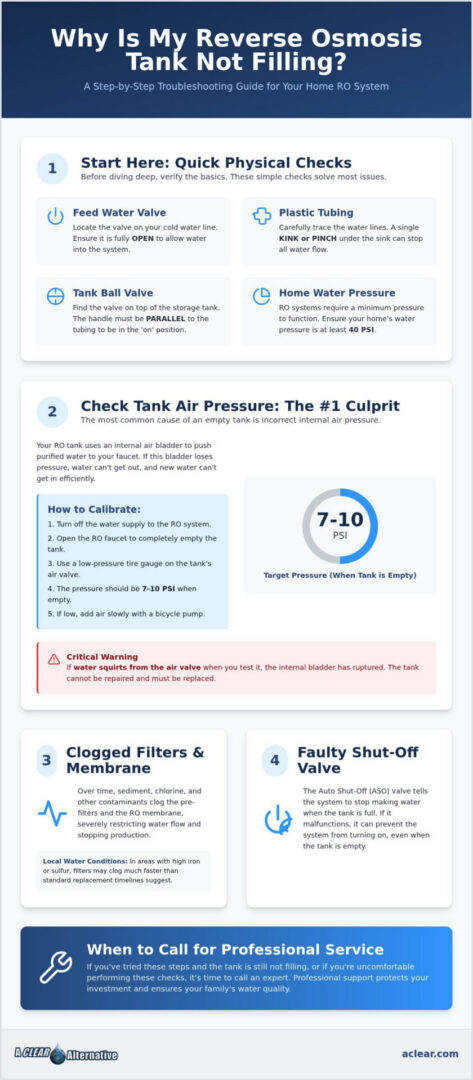
Before you consider replacing expensive parts, start with the most obvious culprits. Often, the reason for a reverse osmosis tank not filling is a simple physical blockage or a closed valve. These systems are sensitive to flow. Even a minor interruption in the water supply can bring the entire purification process to a standstill. Checking these basic connections takes only a few minutes and can save you the cost of a service call.
The Feed Water Valve and Tubing
Your system needs a constant supply of “raw” water to function. Look under your sink and locate the cold water pipe. You’ll find either a small T-adapter or a saddle valve clamped onto the line. This is the entry point for your water. If this valve was accidentally turned off during other plumbing work, your system is essentially thirsty. Over time, these small ports can become restricted by mineral buildup or sediment. If you have older copper or galvanized pipes, a tiny piece of rust can easily clog the feed line.
Don’t forget to inspect the plastic tubing leading into the system. While the tubing is flexible, it isn’t indestructible. It’s very common for a heavy bottle of detergent or a sliding trash bin to pinch a line. A single kink acts like a thumb on a garden hose, stopping the flow. Understanding how reverse osmosis works helps you see that without this initial pressure, the system can’t force water through the membrane to fill the storage tank.
The Tank Ball Valve Position
Check the top of your storage tank. You’ll see a small plastic ball valve where the tubing connects. The handle must be parallel to the tube for water to flow in and out. If the handle is perpendicular, the tank is locked. This often happens during the “under-sink shuffle” when we move items around. A stray box of trash bags can easily bump the handle to the “off” position. While you’re down there, run a finger around the valve to check for moisture. A mechanical failure or a slow leak here can cause the system to lose pressure and stop filling properly.
Finally, verify your home’s main water pressure. For our neighbors in Medford Lakes and Shamong who rely on well water, your pressure tank settings are critical. Your RO system generally requires at least 40 PSI to operate efficiently. If your home’s pressure is too low, the system won’t have the “push” needed to fill the tank against the internal air bladder. It’s a delicate balance that keeps your water flowing smoothly.
Checking and Adjusting Storage Tank Air Pressure
Your RO storage tank is a sophisticated piece of equipment. It relies on a heavy duty internal air bladder to push purified water up to your faucet. If this bladder loses its charge, you’ll find your reverse osmosis tank not filling or delivering water, even if the system is technically running. Improper air pressure is the most common reason for a sudden drop in water volume. To fix this, you’ll just need a low pressure tire gauge and a standard bicycle pump. Locate the Schrader valve on the tank. It’s usually tucked under a small blue or black plastic cap near the bottom or side of the unit.
How to Measure Tank Pressure
Start by turning off the feed water supply and opening the RO faucet until the flow stops. The tank must be completely empty for an accurate reading. Attach your tire gauge to the Schrader valve. You’re looking for a target reading between 7 and 10 PSI. If the gauge shows zero, the bladder has lost its cushion. Pay close attention during this step. If water squirts out of the air valve when you press the needle, the internal diaphragm has ruptured. This means the tank is beyond repair and requires a full replacement to restore your water supply.
Repressurizing the Bladder
If the tank is dry but the pressure is simply low, use your bicycle pump to add air. Do this slowly. Adding too much air too fast can damage the delicate internal membrane. Give it a few pumps, then check the gauge again. You can also perform the “lift test” to confirm your suspicions. If the tank feels heavy but no water comes out of the faucet, it’s full of water but lacks the air pressure to push it out. This is a clear sign that the bladder needs a manual boost.
Maintaining this pressure ensures your RO system remains a reliable form of point-of-use water treatment for your family. It’s a simple maintenance task that preserves the life of your equipment and ensures you always have a full tank ready. If you’ve tried these steps and still struggle with your reverse osmosis tank not filling, it might be time for a professional look. We can help you determine if your tank is salvageable or if it’s time for an upgrade with a professional RO service visit that evaluates your entire system’s health.
Clogged Filters and Membranes: The Silent Flow Killers
Your reverse osmosis system relies on a sequence of specialized filters to deliver that crisp, clean taste you love. Think of your sediment and carbon pre-filters as the security detail for the main event: the RO membrane. If these guards become overwhelmed, they can’t do their job. This leads directly to your reverse osmosis tank not filling because the water simply can’t push through the accumulated debris. While standard manuals suggest changing filters every 6 to 12 months, your local environment plays a massive role in that timeline.
In South Jersey, particularly around Medford Lakes and Shamong, our water has a unique personality. High levels of iron and sulfur are common. These minerals are incredibly “sticky” and can coat a filter in a fraction of the time it takes for city water to do the same. If you notice a metallic tang or a slight odor, your filters are likely screaming for a refresh. Neglecting them doesn’t just slow your flow; it can permanently damage the delicate RO membrane, which typically lasts 2 to 4 years under ideal conditions.
Identifying a Fouled RO Membrane
How do you know if the membrane is the culprit? Try the “trickle test.” Disconnect the tube leading from the membrane housing to the storage tank. With the system running, you should see a steady, thin stream of water about the size of a toothpick. If it’s just a slow, agonizing drip, the membrane is likely fouled. Hard water minerals like calcium and magnesium often create a “scale” that acts like a physical wall. To stay ahead of this, using professional well water testing is the smartest way to predict your filter’s lifespan and avoid a dry tank.
Pre-Filter Maintenance
The first stage is your sediment filter. It catches the “heavy” stuff like sand and rust. It’s the most critical component for maintaining tank filling speed. If it’s dark brown or orange, it’s finished. Next is the carbon filter, which removes chlorine and organic compounds. Watch for “carbon fines” or black dust in your initial flush; this is normal, but a sudden drop in flow after months of use usually means the carbon is spent. When you change them, always place a towel under the unit. Turn off the water supply and release the pressure by opening the faucet first. It’s a simple, clean process that keeps your home’s water health at its peak.
The Auto Shut-Off Valve (ASO) and Check Valve
While filters and pressure tanks get all the attention, two tiny mechanical valves actually control the entire logic of your water purification cycle. The Auto Shut-Off (ASO) valve and the check valve work in tandem to manage pressure. If either of these components fails, you’ll likely find your reverse osmosis tank not filling despite your best efforts at maintenance. These parts are the “traffic controllers” of your system. When they malfunction, the system either runs water to the drain indefinitely or shuts down prematurely, leaving you with an empty storage tank.
A common sign of valve failure is a constant, subtle humming or the sound of water trickling into your sink’s drain line long after you’ve stopped using the faucet. This isn’t just annoying; it’s a waste of resources and a sign that your system’s internal pressure balance is broken. Ensuring your home’s drainage remains clear is vital for overall plumbing health, and specialists like Drain Genie Direct can provide the professional support needed for complex blockages. In our local South Jersey communities like Shamong and Medford Lakes, where we value efficient home systems, keeping these valves in top shape is essential for a high-performing household.
The ASO valve is designed to stop the production of water once the tank reaches about two-thirds of your home’s incoming water pressure. If the internal diaphragm in this valve tears, it can “freeze” the system in the off position. You can perform a simple “faucet test” to check its health:
- Close the ball valve on top of your storage tank.
- Open the RO faucet on your sink.
- Wait for the initial burst of water to turn into a thin trickle.
- Close the RO faucet and wait five minutes.
If you still hear water running to the drain after those five minutes, your ASO valve is likely faulty. Replacing it is a straightforward DIY task. It involves a simple four-tube swap, but you must ensure each color-coded line goes back into the correct port to maintain the pressure differential.
Check Valve Troubleshooting
The check valve is a tiny, often overlooked part located inside the outlet fitting of the membrane housing. Its job is simple: prevent the pressurized water in your tank from flowing backward into the membrane. If this valve leaks, the ASO valve never senses enough pressure to stay closed. This leads to a “cycling” effect where the system turns on and off repeatedly. Because this part is tucked away inside a fitting, many homeowners miss it during a standard filter change. If your reverse osmosis tank not filling issue persists after checking everything else, this small part is your most likely culprit. If you’re tired of troubleshooting and want a guaranteed fix, it’s time to schedule a professional RO service to get your system back to peak performance.
Professional RO Service in Tabernacle, Shamong, and Medford Lakes
Sometimes, troubleshooting a reverse osmosis tank not filling reveals a deeper issue that basic DIY steps can’t resolve. While checking valves and air pressure is a great start, your RO system is part of a larger ecosystem within your home. In the Tri-State area, specifically across South Jersey, our water has a unique character. If you’ve tried the “trickle test” and adjusted your tank pressure but still face a dry faucet, it’s likely that local environmental factors are overwhelming your equipment. Professional intervention ensures your system isn’t just running, but performing at its peak aesthetic and functional potential.
Our team provides a comprehensive system audit that looks beyond the under-sink cabinet. We evaluate how your RO interacts with your home’s plumbing and existing treatment setups. Often, the most effective way to prevent future failures is to implement a whole house water filtration strategy. This approach stops contaminants like iron and sediment before they ever reach your delicate RO membrane, extending the life of your system and ensuring a constant supply of pure water.
Local Expertise for Local Water
We’ve been serving Tabernacle, Shamong, and Medford Lakes since 1991. This history matters because the Pine Barrens mineral profile is unlike anywhere else. We understand the specific challenges of low pH and high iron that characterize our local wells. A national big-box brand might offer a generic solution, but a family-owned service understands the “why” behind your system’s behavior. Our technicians are trained to handle the aggressive water conditions that typically cause a reverse osmosis tank not filling, providing solutions that are as durable as they are effective. The value of local expertise extends to every aspect of plumbing, from sewer inspections to water heater replacement Yucaipa CA from companies like Simple Plumbing Inc, which provide dedicated support for residents in those communities.
Schedule Your RO Maintenance
Modern water health is about more than just fixing what’s broken; it’s about proactive care. Our professional maintenance includes deep cleaning and sanitization of your storage tank and lines to prevent biofilm buildup. If your local well water is particularly acidic, we may recommend upgrading your setup with acid neutralizers. These systems balance your water’s pH, protecting your RO membrane from premature degradation and ensuring your investment lasts for years.
Don’t let a technical glitch disrupt your lifestyle or force you back to bottled water. We offer 24/7 emergency support for those moments when your water quality can’t wait. Whether it’s a simple part replacement or a full system optimization, we’re here to help. Contact A Clear Alternative for expert RO repair today!
Restore Your Flow and Home’s Vitality
An empty tank doesn’t have to mean a broken system. Most issues with a reverse osmosis tank not filling stem from simple pressure imbalances or maintenance needs that have slipped through the cracks. By checking your tank’s air bladder and staying ahead of filter life, you take direct control of your home’s water quality and your family’s well-being. Understanding these mechanics turns a technical frustration into a simple lifestyle adjustment.
In the Tri-State area, our unique well water conditions mean your system works harder than most. Since 1991, our family-owned team has helped neighbors in Medford Lakes and Shamong navigate these challenges with expert care. Whether you need a quick pressure adjustment or a full system audit, we’re here with 24/7 emergency support to ensure your water remains pure and refreshing. Don’t let a technical hurdle stand between you and the lifestyle you deserve. Take the guesswork out of your water health and enjoy the peace of mind that comes with expert support.
Book Your Professional RO System Tune-Up
Frequently Asked Questions
Why is my reverse osmosis tank heavy but no water comes out?
If your tank feels heavy but the faucet is dry, you likely have low air pressure in the internal bladder. The tank is physically full of water, but it lacks the compressed air needed to push that water up to your sink. This is a common maintenance issue for our clients in Medford Lakes. You can usually fix this by adding 7-10 PSI of air with a bicycle pump. If water leaks from the air valve, the bladder is failed.
How long does it take for a reverse osmosis tank to fill up?
A standard 3.2-gallon storage tank usually takes between two and four hours to fill completely from empty. This duration depends on your membrane’s production rate and your home’s incoming water pressure. In areas like Shamong, where well water pressure might fluctuate, you may notice it takes slightly longer during peak usage times. If your system takes more than six hours, it’s a sign that your pre-filters or membrane are starting to clog.
Can I use my RO system if the tank is empty?
You can still get water if your reverse osmosis tank not filling properly, but it will only be a tiny trickle. This flow comes directly from the RO membrane without the pressurized boost from the storage tank. While it’s safe to drink, it’s hardly convenient for filling a pot or a large glass. Restoring the tank’s functionality is the only way to get that brisk, high-volume flow back into your daily kitchen routine.
How do I know if my RO tank bladder is ruptured?
The easiest way to identify a ruptured bladder is to check the air valve, usually located under a plastic cap. Briefly depress the center pin of the valve with a small tool. If air comes out, the bladder is likely intact. However, if water squirts out of the air valve, the internal rubber diaphragm has a hole or tear. Since these bladders aren’t replaceable, you’ll need a new storage tank to restore pressure.
Does low well water pressure affect my reverse osmosis system?
Yes, low pressure is a major hurdle for water purification. Reverse osmosis systems generally require a minimum of 40 PSI to force water through the semi-permeable membrane. If your well pump in Tabernacle is set too low or your pressure tank is failing, your RO system will struggle. This results in excessive water waste and a very slow production rate. We often recommend a booster pump or a pressure tank adjustment to solve this.
What is the correct air pressure for an empty RO storage tank?
When the storage tank is completely empty of water, the air pressure should be between 7 and 10 PSI. It’s vital to drain the water first; otherwise, you’ll get a false reading based on water weight rather than air volume. Use a digital or low-pressure tire gauge for accuracy. Keeping this pressure calibrated ensures your system delivers a strong, consistent stream every time you open the faucet for a refreshing glass of water.
How often should I sanitize my RO storage tank?
We recommend sanitizing your storage tank at least once every twelve months. The best time to do this is during your annual filter replacement. Over time, trace amounts of bacteria can enter the tank and form a biofilm on the bladder. Regular sanitization keeps your water tasting crisp and ensures your system remains a clean, modern addition to your home. It’s a simple step that protects your family’s long-term health and confidence.
Why is my RO system constantly running water into the drain?
Constant draining usually points to a failed Auto Shut-Off (ASO) valve or a faulty check valve. These components tell the system to stop producing water once the tank is full. If they fail, the system “thinks” the tank is still empty and continues to process water, sending the excess straight to the drain. This can lead to a reverse osmosis tank not filling efficiently and significantly higher water bills if left unaddressed for too long.