
How to Test Water Hardness at Home: A Simple Guide
If you’re wondering how to test water hardness at home, you can start with a quick soap test, test strips, or a drop-count kit. Each method offers a different level of detail, and none can diagnose every water-quality concern. The right choice depends on whether you want a rough indication or a reading you can record and compare.
Use a home test as a first step, not a complete water-quality assessment. Strips provide a quick estimate, while a drop-count kit follows a defined procedure to produce a hardness reading. Whichever you use, follow the instructions and check the units, such as milligrams per liter (mg/L) or grains per gallon (GPG), before interpreting the result.
This guide explains how to choose a test, collect a sample, and make sense of the reading. It also covers what hardness results can’t tell you and how to use them when considering water softening. If you’re in Tabernacle, Shamong, or Medford Lakes, these steps can help you decide whether a home check answers your question or whether broader water testing may be useful.
Key Takeaways
- Learn how to test water hardness at home by choosing a method that fits the level of detail you need.
- Follow the kit’s directions for collecting a sample, timing the test, and reading the result.
- Check the test chart and units before deciding what a hardness result means.
- Know when a home test may answer your question and when broader water testing could help.
- Use measured water conditions and household priorities to guide a water-softening decision.
What a Home Water Hardness Test Can, and Cannot, Tell You
A home hardness test can help explain mineral-related signs such as scale, but it answers a narrower question than “Is my water safe?” Water hardness measures dissolved minerals, mainly calcium and magnesium. Overall water quality includes many other characteristics and potential contaminants.
What does water hardness measure?
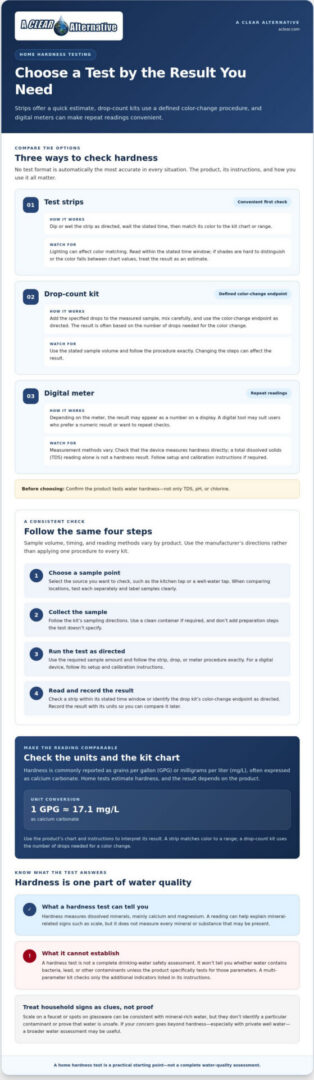
Calcium and magnesium can dissolve into water as it moves through soil and rock. They’re the main contributors to hardness, but a hardness result doesn’t measure every mineral or substance that may be present. Hardness is commonly reported in grains per gallon (GPG) or milligrams per liter (mg/L), often expressed as calcium carbonate. One GPG is approximately 17.1 mg/L as calcium carbonate. For more background on how hardness forms and is measured, see this overview of Hard water.
Home tests estimate hardness, and the result depends on the product. A strip matches a color to a range; a drop-count kit bases its result on the number of drops needed for a color change. Digital meters vary in what they measure, so check the product description rather than assuming every meter measures hardness directly. Similar drop-count and strip methods are also standard in pool maintenance, where specialists like Pool Blitz manage routine testing and expert water balancing. When learning how to test water hardness at home, use the kit’s chart and instructions to interpret the result.
Can a hardness test tell you whether water is safe?
No. A hardness test isn’t a complete drinking-water safety assessment. A typical hardness test won’t tell you whether water contains bacteria, lead, or other contaminants unless the product specifically tests for those parameters. A multi-parameter kit may check additional indicators, but only for the tests listed in its instructions.
Scale on a faucet or spots on glassware can be consistent with mineral-rich water, but they don’t identify a particular contaminant or prove the water is unsafe. These are clues about how water behaves in the home, not a substitute for testing the concern you want to investigate.
If your water comes from a private well, a hardness reading is only one part of the picture. The South Jersey well-water testing guide explains why broader well-water testing can be useful. A home hardness test is a practical starting point; comprehensive water testing can assess concerns beyond mineral hardness.
Choose a Home Water Hardness Test: Strips, Drops, or Digital Meters
Choose a test based on the result you need: a quick indication, a reading from a defined procedure, or a reusable digital tool. No format is automatically the most accurate in every situation. The product, instructions, and how you use it all matter. First, confirm that the kit measures water hardness, not just total dissolved solids (TDS), pH, or chlorine.
Test type | Ease of use | Result format | Best suited to
Test strips | Quick and simple; dip or wet as directed | Color matched to a chart or range | A convenient first check
Drop-count kit | Requires measured drops and careful mixing | Often based on the number of drops to a color-change endpoint | A more hands-on reading with a defined procedure
Digital meter | Requires setup and, for some devices, calibration | Numeric display, depending on the meter | Repeat readings or users who prefer a digital result
Are water hardness test strips easy to use?
Usually. Dip or wet the strip as directed, wait the stated time, then compare its color with the kit’s chart. Pay attention to the details: lighting can affect how colors appear, and waiting too long can make a result harder to compare. If neighboring shades are difficult to distinguish or the color falls between chart values, treat the result as an estimate rather than a precise measurement.
When might a drop-count kit or digital meter help?
A drop-count kit may suit you if you want a reading based on a stated color-change endpoint. Use the specified sample volume and add drops exactly as directed, since changing the procedure can affect the result. A digital meter may be convenient for repeat checks, but measurement methods vary. If the manual calls for calibration, follow its instructions. Confirm that the device measures hardness directly, because a TDS reading alone isn’t a hardness result.
For a straightforward first check, use strips and follow the chart carefully. Choose a drop-count kit if you prefer a reading tied to a color-change endpoint. A digital meter may suit repeat testing if its stated measurement matches your goal. The U.S. Geological Survey’s explanation of water hardness provides further context about hardness readings and their everyday effects.
If your question goes beyond hardness, comprehensive water testing can help assess broader water concerns.
How to Test Water Hardness at Home Step by Step
A consistent process makes your result easier to interpret and compare later. Sample volume, timing, and reading methods vary by product, so follow the manufacturer’s instructions instead of applying one procedure to every kit.
- Choose a sample point. Decide which source you want to check, such as the kitchen tap or a well-water tap. If you’re comparing locations, test each separately and label the samples clearly.
- Collect the sample. Follow the kit’s sampling directions. Use a clean container if the instructions require one, and don’t add preparation steps the test doesn’t specify.
- Run the test. Use the required sample amount and follow the strip, drop, or meter procedure exactly. For a digital device, follow its setup and calibration instructions.
- Read the result on time. Check a strip within the stated time window or identify the drop kit’s color-change endpoint as directed. For a meter, use the displayed value and the device’s guidance.
- Record the result. Note the date, sample location, test method, result, and unit. This makes it easier to compare future checks.
How should you collect a sample for a home test?
Start by identifying the water source. A result from the kitchen tap describes that sample, not necessarily every tap or source in your home. If the kit calls for a container, use one that’s clean and suitable according to its instructions. Follow any specific guidance about collecting the sample. Don’t assume steps such as flushing the tap are required unless the test directions say so.
How do you read and record the result?
Timing matters. A strip’s color can shift, so compare it with the chart within the stated window. With a drop-count kit, stop at the specified endpoint and interpret the result using the kit’s method. Record the value and unit, such as mg/L or grains per gallon, rather than relying on memory or a color impression.
If a result seems unexpected, repeat the test according to the product directions before drawing conclusions. Check that you used the right sample volume and followed the stated timing. When testing again later, use the same location and method when possible so you can compare like with like.
Quick checklist: Choose the sample point, collect water as directed, follow the test procedure, read the result within the specified time, and record the date, location, method, unit, and result.
This routine is the practical core of how to test water hardness at home. Keeping a clear record helps you spot differences and decide whether a home check answers your question or broader testing may be useful.
What Your Water Hardness Result Means, and When to Retest
A hardness number needs context. Categories and cutoffs can differ between sources and test products, so start with the chart supplied with your kit. For general reference, the U.S. Geological Survey classifies water as soft at 0-60 mg/L, moderately hard at 61-120 mg/L, hard at 121-180 mg/L, and very hard above 180 mg/L. Use these ranges as a reference, not as a substitute for your kit’s instructions.
Before interpreting the result, check that its unit matches the unit on the chart. A GPG reading can’t be compared directly with a chart in mg/L without conversion. The test method, reporting units, and sampled water source all affect how to interpret a hardness result. Note whether you tested a kitchen tap, well-water tap, or another source.
Why might two home tests give different results?
Small differences don’t necessarily mean one test is faulty or that your water has changed. Results can vary if you collect samples differently, read a strip outside its specified time window, use a kit that’s old or improperly stored, or compare colors under different lighting. Drop-count procedures can also be affected by sample volume or how you identify the endpoint. If a reading surprises you, repeat the test according to its instructions. For a meaningful comparison, keep the method and sample location consistent.
One unexpected reading doesn’t prove a lasting water problem or a health concern. Record the result and retest as directed before drawing a conclusion. If results remain unclear, a home kit may not provide the precision or broader information you need.
When is a home test not enough?
A hardness test focuses on hardness. It won’t answer questions about contaminants or other water-quality concerns unless the product specifically tests for them. If you’re concerned about a private well, broader well-water testing can investigate issues a hardness strip can’t assess. A measured hardness result is useful for treatment planning, but it’s only one part of the decision. For an overview of treatment approaches, explore this whole-house water filtration guide.
If you need answers beyond a home kit, comprehensive water testing can assess water conditions more broadly.
From a Home Test to a Water-Softening Decision
A hardness result is useful evidence, not an automatic instruction to install a softener. Consider the reading alongside what you notice at home and what you want to improve. Hard water may contribute to mineral scale on fixtures, spots on dishes or glass, and soap or detergent that seems less effective. These effects can be frustrating, but they don’t mean every household needs the same treatment.
Does a hard-water result mean you need a softener?
There isn’t one test threshold that makes a softener the right choice for every home. Consider the result alongside practical concerns: Is scale recurring on faucets or appliances? Are spots or cleaning issues affecting your routine? How much do these problems matter to your household? A water-softening plan should reflect actual water conditions and your priorities, not a number viewed in isolation.
If a result is near a category boundary or doesn’t match what you’re seeing, don’t rush into a decision based on one reading. Use it as a starting point for understanding the water. A home check helps frame the question; a clearer picture of the water and your household needs can guide a more considered next step.
What can a broader water assessment add?
A hardness test focuses on hardness. Comprehensive water testing can examine concerns beyond calcium and magnesium, providing information a hardness-only result can’t. This matters if you want to understand overall water quality, not just scale or cleaning issues. It also helps align treatment choices with the problem you want to address instead of assuming softening is the answer to every water concern.
That’s the practical value of learning how to test water hardness at home: start with a simple measurement, then recognize when the question calls for broader testing. A Clear Alternative provides comprehensive water testing and water softening for homeowners, including those in Tabernacle, Shamong, and Medford Lakes. These services can help you consider measured water conditions alongside household priorities.
For a practical next step, explore A Clear Alternative’s water services to learn about water testing and softening options.
Turn Your Hardness Reading Into a Confident Next Step
A home test is a useful starting point. Choose a kit designed to measure hardness, follow its instructions, and record the result with its units. Then consider the reading alongside any scale, spotting, or cleaning issues you notice. A hardness result doesn’t describe every aspect of water quality, so broader concerns may call for more complete testing.
Knowing how to test water hardness at home can help you make a more informed decision, but no single reading automatically means every household needs a softener. Let measured water conditions and your household’s priorities guide the next step.
A Clear Alternative provides comprehensive water testing and water-softening services for homeowners in Tabernacle, Shamong, and Medford Lakes. Explore water testing and treatment services to discuss a practical next step for your home.
Frequently Asked Questions
How can I test my water hardness at home without a kit?
Try a soap test for a rough first impression. Add a few drops of pure liquid soap to a bottle of tap water, shake it, and observe the result. Water that lathers readily is likely softer; little lather and cloudy-looking water may suggest hardness. This method doesn’t give a numerical result or replace a hardness test kit. If you’re learning how to test water hardness at home, treat the soap test as a clue, not a precise measurement.
Are water hardness test strips accurate?
Test strips can provide a useful estimate when you follow the product’s instructions, but performance depends on the kit and how you use it. Dip or wet the strip as directed, wait the stated time, then compare its color with the supplied chart. Lighting, timing, and difficulty distinguishing shades can affect interpretation. For results you can compare later, record the value or range and units instead of relying on memory.
What is the difference between GPG and PPM for water hardness?
GPG means grains per gallon, while PPM means parts per million. They’re different units for expressing hardness, so compare your result with a chart that uses the same unit or convert it first. For hardness reported as calcium carbonate, 1 grain per gallon is approximately 17.1 milligrams per liter (mg/L); in water, mg/L is commonly used as an approximate equivalent to PPM. Check your kit’s instructions for its reporting basis.
Can a water hardness test tell me if my water is safe to drink?
No. A hardness test measures mineral hardness, mainly associated with calcium and magnesium, and doesn’t establish whether water is safe to drink. It won’t detect bacteria, lead, or other contaminants unless the product specifically tests for them. Scale on fixtures or spots on glassware can be associated with mineral-rich water, but they don’t identify a contaminant. If you have a safety concern, choose testing designed to assess that concern.
How often should I test my home’s water hardness?
There isn’t one testing schedule that fits every household. A home test can establish a baseline. You may choose to retest if water conditions seem to change, you notice new scale or spotting, or you’re considering water treatment. Follow the kit directions each time, and use the same sample location and method when comparing results. If your water source or household concerns change, broader testing may be useful.
Why do my water hardness test results change?
Different readings can result from changes in sample collection, sample volume, test timing, kit condition, or color interpretation. For example, a strip read outside its instructed time window may be harder to compare with its chart. Test methods can also produce different results. Repeat an unexpected reading as directed, and keep the method and sample location consistent. One differing result alone doesn’t prove a lasting water problem.
When should I get a professional water test in South Jersey?
Consider broader testing if you want to investigate concerns beyond hardness, rely on a private well, or get unclear or inconsistent home-test results. A hardness kit can’t answer every water-quality question or assess contaminants it wasn’t designed to detect. A Clear Alternative provides comprehensive water testing and water softening for homeowners in Tabernacle, Shamong, and Medford Lakes. Testing can help clarify water conditions before you decide what steps make sense for your household.