
Reverse Osmosis Faucet Installation: A 2026 Homeowner’s Guide
Imagine standing over your pristine quartz countertop with a diamond-grit drill bit in hand, wondering if one wrong move will turn your kitchen upgrade into a costly disaster. It’s a feeling many South Jersey homeowners share when facing a reverse osmosis faucet installation for the first time. You crave the aesthetic and health benefits of purified water, but the fear of cracking expensive stone or mismanaging color-coded tubing is a real hurdle.
We believe your home should reflect a modern, health-conscious lifestyle without the technical headaches. Pure water shouldn’t mean high stress. This guide empowers you to master the installation process while ensuring your seals are tight and your kitchen remains flawless. We’ll break down the technical requirements for 2026, including local plumbing codes and the specific needs of South Jersey water. You’ll learn the step-by-step path to a secure setup and discover exactly when to enjoy a DIY win versus when it’s time to call the South Jersey professionals for a guaranteed, leak-free finish.
Key Takeaways
- Learn how to distinguish between air gap and non-air gap faucets to ensure your drainage meets South Jersey standards and prevents unwanted noise.
- Check our curated list of essential tools to prepare your countertop for a reverse osmosis faucet installation while maintaining its aesthetic integrity.
- Follow our streamlined, step-by-step guide to assembling and mounting your new faucet for a professional-grade, leak-free finish.
- Understand the risks of drilling through premium materials like granite and learn when calling in a professional is the smartest investment for your home’s safety.
- Master the post-installation flushing process to remove carbon fines and air bubbles, ensuring your water is pure from the very first glass.
Understanding the Dedicated Reverse Osmosis Faucet
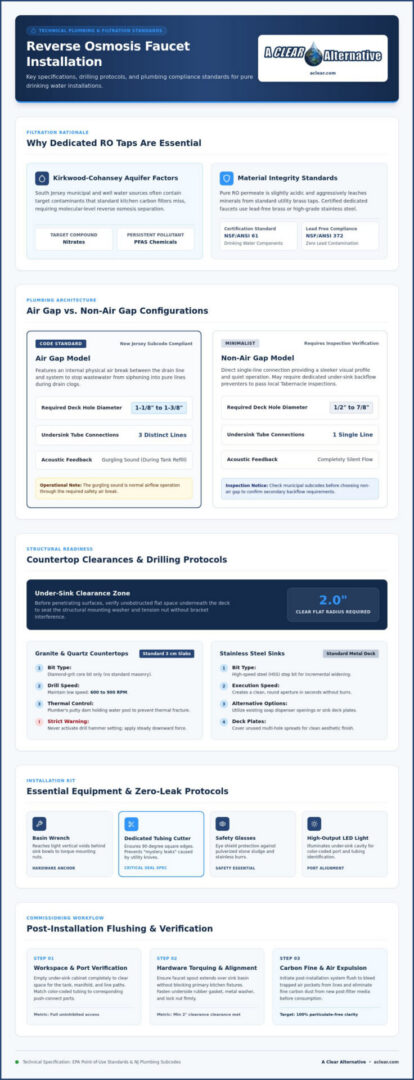
Your standard kitchen tap handles high-volume flow for washing dishes or filling large pots. A reverse osmosis faucet installation serves a more refined purpose. These dedicated taps are specifically engineered to deliver water that has undergone the reverse osmosis filtration process. This technology is vital in South Jersey, where the Kirkwood-Cohansey aquifer often contains nitrates or PFAS that standard carbon filters might miss.
Using a separate faucet is about protecting your health and your home’s infrastructure. Standard kitchen taps often contain internal components that aren’t rated for the slightly acidic nature of pure RO water. Over time, this acidity can leach metals from a standard tap into your glass. Dedicated RO faucets use lead-free brass or high-grade stainless steel certified to NSF/ANSI 61 and 372 standards. This ensures your water stays as clean as the day it left the membrane and prevents any cross-contamination with the unfiltered municipal supply.
Air Gap vs. Non-Air Gap Faucets
Choosing the right faucet depends on your home’s plumbing requirements and your tolerance for noise. Air gap faucets are frequently required by New Jersey plumbing subcodes because they provide a physical air break. This break prevents wastewater from siphoning back into your purification system if the drain ever clogs. These models require three separate tube connections and a larger mounting hole, typically between 1-1/8 and 1-3/8 inches.
You might hear a distinct gurgling sound from an air gap faucet while the storage tank refills. This is simply the sound of air and water moving through the safety break. Non-air gap faucets are sleeker and quieter. They use a single line and fit into smaller holes, usually 1/2 to 7/8 inches. While they look more minimalist, they may require an under-sink backflow preventer to stay compliant with local Tabernacle inspections.
Matching Your Kitchen’s Aesthetic
A functional upgrade shouldn’t compromise your kitchen’s style. Modern RO faucets come in various finishes like matte black, brushed gold, and polished chrome to match your primary hardware perfectly. If you have an existing soap dispenser or an unused fourth hole in your sink deck, a reverse osmosis faucet installation can often utilize that space without any new drilling. For multi-hole sinks, deck plates provide a clean look by covering unused openings. This ensures your high-tech water solution looks like a seamless, premium design choice rather than a technical afterthought.
Preparation: Tools and Countertop Readiness
Successful reverse osmosis faucet installation begins long before you pick up a drill. It starts with a clear workspace and the right gear. You’ll need a basin wrench to reach the tight spaces behind the sink bowl, a dedicated tubing cutter for perfectly square edges, and safety glasses to protect against metal or stone shards. Don’t rely on a standard utility knife for your tubing. A jagged cut is the most common cause of “mystery leaks” in new systems. If you’re feeling unsure about the technical requirements, getting expert water treatment guidance can save you hours of troubleshooting later.
Choosing the perfect location requires a “look twice” approach. On the surface, you want the spout to reach the sink comfortably without obstructing your main faucet. Underneath, however, is where the real constraints live. You must ensure there’s at least two inches of clear flat space around the mounting hole to accommodate the large washer and nut. Check for cabinet braces, sink clips, or plumbing lines that might block your path. Following EPA point-of-use reverse osmosis standards during this phase ensures your system has the proper clearance to function efficiently and safely for years to come.
Drilling Through Different Materials
This is the moment that causes the most anxiety for homeowners. If you have a stainless steel sink, a high-speed steel step bit will create a clean hole in seconds. Natural stone is different. For granite or quartz, you must use a diamond-grit core bit. Most South Jersey kitchens feature 3 cm stone slabs, which require patience. Run your drill at a low speed, typically between 600 and 900 RPM, and use a ring of plumber’s putty to hold a small pool of water around the bit. This cooling water prevents the stone from overheating and cracking. Never use the hammer setting on your drill; steady, consistent pressure is your best friend here.
Clearing the Workspace
A cluttered cabinet is a recipe for frustration. Empty the entire area under your sink to make room for the RO tank, manifold, and your own shoulders. Lighting is often overlooked. Set up a bright LED work light so you can clearly see the color-coded ports on the faucet base. Before you begin, shut off the cold water supply valve and open the existing kitchen tap to bleed off any residual pressure. This simple step prevents a surprise spray when you eventually tap into the line. Organizing your components on a clean towel nearby keeps small gaskets and trim plates from disappearing into the dark corners of your cabinetry.
Step-by-Step Reverse Osmosis Faucet Installation
Once your countertop is ready, the physical assembly of your new tap begins. This is the moment where your aesthetic choice meets technical precision. Start by sliding the decorative escutcheon plate and the large rubber gasket onto the faucet’s stem. This gasket is your primary defense against water seeping from the sink deck into your cabinetry below. Ensure it sits perfectly flush against the base of the faucet body. Drop the stem through the mounting hole, making sure the faucet is centered and facing the desired direction before you head under the sink.
A successful reverse osmosis faucet installation relies on a secure, stable base. If the faucet wobbles when you turn the handle, the internal seals will eventually fail. When you handle these components, keep your hands clean to avoid introducing bacteria into the system. The CDC home water treatment systems guide emphasizes that proper sanitation during setup is vital for long-term water safety and effective contaminant removal. Once the hardware is hand-tight, perform a final check on the alignment above the sink before the permanent tightening.
Mounting Under the Sink
Working in the cramped space behind a sink bowl is challenging. This is where your basin wrench becomes indispensable. Slide the plastic spacer, the metal star washer, and the mounting nut onto the stem in that specific order. Use the basin wrench to tighten the nut until the faucet is immobilized. You don’t need to over-torque it; just ensure it cannot rotate when the handle is operated. Double-check that the rubber gaskets haven’t shifted during this process. A misaligned gasket is the most common reason for a slow, hidden leak that can damage your vanity over time.
Connecting the Tubing
Most modern systems use “Push-to-Connect” quick-connect fittings. These are incredibly reliable if you follow one rule: your cuts must be perfectly square. Use a dedicated tubing cutter rather than scissors to avoid crimping the line. Push the tubing into the fitting until you feel it hit the internal stop. Give it a gentle tug to ensure the metal teeth have grabbed the plastic. If your faucet uses traditional compression nuts, ensure the plastic sleeve is seated correctly before tightening the nut with a small wrench. Color-coding is your best friend here. Typically, the blue line represents your purified supply, while red or black lines handle the brine discharge for air gap models. Keep your lines organized to make future filter changes much simpler.
Finish the job by wiping down the faucet and checking the alignment one last time. A professional look means the spout is perfectly centered and the handle has full range of motion without hitting the backsplash. Your high-tech water solution is now physically part of your home.
DIY vs. Professional Installation in South Jersey
Deciding whether to tackle a reverse osmosis faucet installation yourself depends on more than just your weekend schedule. It’s a question of precision and long-term liability. While the “can-do” spirit is admirable, the technical reality of drilling through premium materials like granite or quartz carries significant risk. One hairline fracture can turn a budget-friendly project into an expensive countertop replacement. Beyond the aesthetics, an incorrect seal under the sink can lead to slow, silent water damage that isn’t discovered until mold has already taken hold in your cabinetry.
In areas like Tabernacle or Medford Lakes, water chemistry adds another layer of complexity. If your home relies on a private well, your system needs to be perfectly calibrated to handle specific pressure variations. A professional installer doesn’t just connect tubes; they ensure the entire system is optimized for your specific water profile. If you run into trouble mid-project, having a professional “safety net” ensures your kitchen doesn’t stay out of commission for days. If you’re ready for a stress-free upgrade, book a professional setup to ensure your system performs at its peak from day one.
Local Plumbing Code Compliance
New Jersey follows strict plumbing subcodes regarding cross-connection and backflow prevention. For instance, the reject water from your RO system must discharge through an approved air gap or a backflow-prevented drain adapter. Licensed experts understand these municipal requirements in Burlington County, ensuring your installation is fully compliant. This provides essential peace of mind for insurance purposes, as unpermitted plumbing work can sometimes complicate future claims or home sales. A pro ensures that your modern life choice meets every legal and safety standard.
The ‘A Clear Alternative’ Advantage
Choosing professional service means more than just a leak-free finish. It includes comprehensive well water testing to confirm your filtration system is actually removing the contaminants common in South Jersey, such as nitrates or PFAS. We’ve been family-owned since 1991, and we specialize in the unique water challenges of the Kirkwood-Cohansey aquifer. Our service includes professional system calibration and 24/7 emergency support if a concern ever arises. We don’t just sell technology; we deliver the confidence that comes with knowing your family’s water is pure and your home is secure.
Post-Installation: Flushing and Maintenance
Completing the physical reverse osmosis faucet installation is a major win for your home’s health, but you shouldn’t fill your glass just yet. The first flush is a non-negotiable step. New carbon filters often contain loose “fines” or dust that can turn the first few gallons of water gray. Additionally, air trapped in the system might make the water appear milky or cloudy. Open the faucet and let the entire storage tank drain completely. Once it’s empty, close the tap and allow the tank to refill, which usually takes two to four hours. Repeat this process at least twice to ensure every drop is crystal clear and free of manufacturing residuals.
Vigilance is your best defense against water damage during the first 24 hours. Even a perfectly executed setup can develop a “slow drip” as the system reaches full operating pressure. Place a dry paper towel under every connection point and check it periodically. If the towel stays bone-dry, your seals are secure. To maintain the premium look of your hardware, avoid using abrasive scrubbers or harsh chemical cleaners. A simple wipe with a soft, damp cloth and mild dish soap is all you need to keep the finish looking brand new, especially in South Jersey where iron in the water can lead to stubborn staining if left unchecked.
Troubleshooting Common Issues
If you notice a sudden drop in flow rate, don’t panic. This often indicates that a filter is overdue for replacement or that the tank’s internal pressure needs a slight adjustment. For those with air gap models, a persistent gurgling sound usually means the 3/8-inch drain line has a slight kink or is sagging, causing water to pool. Ensure the drain line follows a straight, downward path to the sink tailpiece. If the faucet drips from the spout after you turn it off, it may be a sign of a faulty internal valve or high system pressure that needs professional calibration to prevent premature wear on your new fixture.
Integrating with Your Whole Home Strategy
A dedicated RO tap is the final stage of a sophisticated water strategy. In Tabernacle and Shamong, the naturally acidic water from the Kirkwood-Cohansey aquifer can be hard on metal components. Utilizing acid neutralizers is a smart move to balance pH levels, which prevents your faucet’s internal seals from corroding over time. Furthermore, a whole house water filtration system acts as a protective shield. By removing heavy sediment and iron before the water even reaches your kitchen, you significantly extend the life of your RO membranes and your faucet. Scheduling a professional maintenance check-up once a year ensures these integrated systems work in perfect harmony, giving you total confidence in every sip.
Secure Your Pure Water Future
Mastering a reverse osmosis faucet installation is about more than just plumbing; it’s an investment in your family’s health and your kitchen’s modern aesthetic. We’ve explored how choosing the right hardware, preparing your countertop with precision, and following a strict flushing protocol ensures a leak-free, high-performance setup. Whether you’re navigating the complexities of South Jersey well water or simply want a pristine, professional finish, the right approach makes all the difference.
If the technical hurdles of drilling through stone or managing color-coded tubing feel overwhelming, you don’t have to go it alone. A Clear Alternative has been family-owned and operated since 1991, providing expert water solutions across NJ, PA, NY, and DE. We offer 24/7 emergency support to ensure your home stays protected at all times. Schedule your professional RO installation with A Clear Alternative today! You deserve the confidence of knowing your water is pure and your installation is guaranteed. Your path to refreshing, purified water is just one step away.
Frequently Asked Questions
Do I need a special drill bit for my granite sink?
Yes, you absolutely need a diamond-grit core bit for granite or quartz. Standard masonry or high-speed steel bits will overheat and likely crack your expensive stone. Most modern kitchens in Tabernacle feature these premium surfaces, requiring a slow-speed drill and water cooling. If you aren’t comfortable with this level of precision, our team can handle the drilling to ensure a flawless, chip-free result.
Can I connect my RO system to my existing kitchen faucet?
Standard faucets aren’t designed for purified water. Pure RO water is slightly acidic and can leach metals from the internal components of a regular kitchen tap. A dedicated tap ensures your water stays pure and protects your main fixture from corrosion. If you want a single-tap look, ask us about modern 3-way faucets that isolate RO water from your standard hot and cold supplies.
Why is my new RO faucet making a gurgling sound?
Gurgling is a normal characteristic of air gap faucets. It happens when the brine water discharges into your sink’s drain line. If the sound is excessively loud, check the 3/8-inch drain tubing for any sags or loops. Straightening the line often reduces the noise. Homeowners in Medford Lakes often prefer non-air gap models with separate backflow preventers to keep their minimalist kitchens quiet and serene.
How often should I replace the tubing on my RO faucet?
You don’t need to replace the tubing during every filter change. Most high-grade LLDPE tubing lasts 5 to 10 years if it’s protected from sunlight and harsh chemicals. However, you should inspect the lines annually for brittleness or discoloration. During a professional reverse osmosis faucet installation, we ensure the lines are secured and routed away from heat sources to maximize their lifespan and prevent leaks.
Is an air gap faucet required by law in New Jersey?
New Jersey plumbing subcodes require an air break or backflow prevention on water systems discharging into drains. While an air gap faucet is the most common solution, local inspectors in Shamong may allow alternative backflow preventers. It’s vital to stay compliant to protect your home’s potable water. We always ensure your setup meets current 2026 safety standards for total insurance peace of mind.
What should I do if my RO faucet has very low water pressure?
Low pressure usually stems from a depleted storage tank or clogged filters. Your RO tank should have an internal air pressure of 5 to 7 psi when it’s completely empty of water. If the tank is heavy but the flow is weak, the internal bladder may have failed. We provide 24/7 support for these issues, helping you restore a brisk, refreshing flow to your kitchen tap.
Can I install a reverse osmosis faucet on a pedestal sink?
Pedestal sinks rarely have the necessary deck space for a secondary faucet. Since there’s no cabinet to hide the RO tank and manifold, this setup requires a more creative approach. You might consider mounting the faucet to a nearby countertop or using a wall-mounted fixture. We’ve helped many Shamong residents find discreet, aesthetic solutions for their historic homes without compromising on water quality.
How do I know if my RO faucet is lead-free?
Look for the NSF/ANSI 61 and 372 certification marks on the packaging or the faucet base. These labels guarantee that the product meets federal lead-free requirements, with a weighted average lead content of less than 0.25 percent. At A Clear Alternative, we only install certified hardware. This ensures that the water your family drinks remains as pure as the day it was filtered.