
UV Water Sterilizer Bulb Replacement: The Complete 2026 Maintenance Guide
Your UV lamp is actually a timer, not just a lightbulb. Waiting for it to flicker out or for that annoying controller alarm to start beeping means your family has likely been drinking unprotected water for weeks. If you’ve been putting off your uv water sterilizer bulb replacement because you’re afraid of cracking a fragile quartz sleeve, you’re not alone. Many homeowners in Tabernacle and Medford Lakes feel that same uncertainty. You deserve to feel confident that every glass of water is pure, without the stress of a high-stakes DIY gamble.
We understand the desire for professional-grade safety combined with the convenience of modern home maintenance. This guide ensures your water remains 99.9% free of bacteria and viruses by teaching you exactly when and how to service your system. You’ll learn why the 9,000-hour lifespan is a non-negotiable limit and how to handle the updated 2026 disinfection standards. We’ll walk through the replacement process step-by-step, highlight the risks of skipping a maintenance cycle, and help you decide when it’s time to call in a specialist to guarantee your peace of mind.
Key Takeaways
- Understand why the 9,000-hour rule is the industry benchmark for safety and why waiting for a total burnout leaves your water unprotected.
- Learn to identify the “blue glow” fallacy and how to correctly interpret digital alarm codes like “A3” or “End of Life.”
- Follow a clear, step-by-step method for a successful uv water sterilizer bulb replacement while protecting yourself from harmful UV-C exposure.
- Discover how to maintain the quartz sleeve and O-rings to prevent leaks and ensure maximum light penetration through the water.
- Determine when a professional system calibration is necessary to verify that your ballast and sensors are functioning at peak efficiency.
Why UV Lamp Maintenance is Non-Negotiable for Safe Water
Your UV system is a silent guardian. It works through a sophisticated process called Ultraviolet germicidal irradiation (UVGI). This specific wavelength of light penetrates the cell walls of microorganisms like E. coli, Giardia, and Cryptosporidium. It scrambles their DNA, making it impossible for them to reproduce. If they can’t reproduce, they can’t cause infection. This is why a timely uv water sterilizer bulb replacement is the difference between a safe home and a significant health risk.
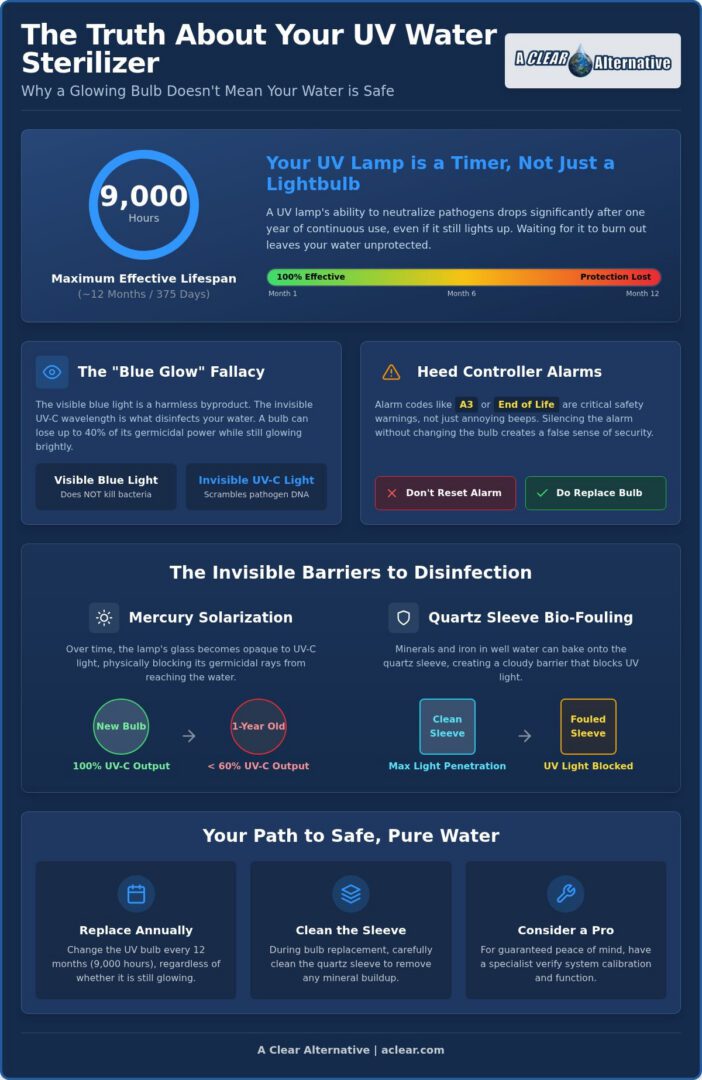
Over time, a physical phenomenon called mercury solarization occurs within the lamp. The glass of the bulb slowly becomes opaque to UV-C light due to the constant electrical arc. Even though the bulb remains lit, the germicidal intensity drops significantly after about 12 months of continuous use. For private well owners in South Jersey, this loss of power is invisible but dangerous. Without that peak intensity, resilient pathogens can slip through your taps entirely unharmed, even if the system looks like it’s working perfectly.
UV-C Light vs. Visible Light
Don’t let the “blue glow” fool you. The light you see with your eyes is just a harmless byproduct of the electrical arc; it isn’t the part that kills bacteria. UV-C light is actually invisible to the human eye. A lamp can lose up to 40% of its germicidal effectiveness while still appearing bright and healthy. Relying on your eyes to judge a bulb’s health is a gamble you shouldn’t take with your family’s safety. When the 12 month mark hits, the protection is gone, regardless of the glow.
The Impact of Bio-Fouling
In areas like Tabernacle and Medford Lakes, well water often carries high mineral or iron content. These minerals can bake onto the quartz sleeve, creating a cloudy barrier known as bio-fouling. Even a brand-new bulb won’t work if the light can’t reach the water through a crusty sleeve. To keep your system running at peak performance, you often need to pair your sterilizer with whole house water filtration systems. This pre-treatment ensures the water is clear enough for the UV-C light to do its job effectively, preventing the “shadowing” effect that lets bacteria hide.
When to Replace Your UV Water Sterilizer Bulb: The 9,000-Hour Rule
A standard UV lamp is designed to provide peak performance for approximately 9,000 hours. This translates to exactly 375 days of continuous operation. While the bulb might still look like it’s functioning after this period, its ability to kill bacteria drops below the safe threshold. This 12 month standard is the industry benchmark because it accounts for the physical limits of the lamp’s internal components. For families in Tabernacle and Shamong, sticking to a strict uv water sterilizer bulb replacement schedule is the simplest way to ensure your well water remains pathogen-free year-round.
Your UV controller is your first line of defense. When you see codes like “A3” or a flashing “End of Life” indicator, your system is telling you that the 9,000-hour window has closed. It’s incredibly tempting to simply press a button and reset the alarm to stop the beeping. However, doing so without a physical uv water sterilizer bulb replacement leaves you with a false sense of security. You aren’t just silencing a noise; you’re silencing a vital safety warning about your home’s water quality.
Several external factors can impact how long your lamp actually lasts:
- Power Surges: Unstable electricity can damage the lamp’s filaments.
- Excessive Cycling: Turning the system on and off frequently wears the bulb down faster than continuous use.
- Water Quality: High mineral content can lead to heat buildup, stressing the glass.
If you live in an area prone to summer thunderstorms, your ballast might experience stress that degrades the lamp faster than the standard calendar year suggests. If you’re unsure about your system’s current status, scheduling a professional water quality audit can provide the clarity you need.
Tracking Your System’s Age
Modern UV ballasts feature digital countdown timers that make tracking easy. They start at 365 and count down to zero. If you have an older system without a display, we recommend marking the date on the system housing with a permanent marker. Government health departments emphasize the importance of maintaining UV light disinfection systems through rigorous scheduling. Never rely on your memory alone when it comes to microbiological safety.
Signs of Diminished UV Intensity
While UV light doesn’t change the taste of water, a sudden shift in flavor or clarity can indicate that your system is failing to neutralize organic matter. Solarization is the technical term for the gradual degradation of the lamp’s glass, which eventually blocks the germicidal wavelengths from reaching the water. If you notice a “swampy” smell or if a routine water test comes back positive for coliform, your UV lamp has likely passed its effective lifespan. A failed water test is the ultimate, and most dangerous, sign that maintenance is overdue.
Step-by-Step Guide: How to Safely Replace Your UV Lamp
Performing a uv water sterilizer bulb replacement is a foundational ritual of modern home maintenance. It’s the moment you take direct control of your family’s health and the purity of your environment. While the process involves technical components, it’s designed to be straightforward and rewarding. You don’t need a degree in engineering to succeed; you just need a methodical approach and a respect for the technology involved.
Safety is your absolute priority during this process. UV-C light is incredibly effective at neutralizing pathogens, but it’s equally aggressive toward human tissue. Never look directly at a lit UV lamp. Even a few seconds of exposure can cause permanent retinal damage or “welder’s flash,” a painful sensation often described as having sand in your eyes. Always ensure the system is completely powered down before you begin your work.
Essential Tools and Safety Gear
Before you start, gather your supplies to ensure a smooth transition. You’ll need a pair of clean latex or nitrile gloves. This isn’t just about hygiene. The natural oils on your skin can etch the glass of the bulb when it heats up. These “hot spots” cause the lamp to fail prematurely, often within weeks instead of months. You should also wear safety glasses to protect your eyes from accidental exposure or glass fragments. Finally, verify your replacement SKU. Using the wrong bulb length or pin configuration can damage your ballast and leave your water untreated.
The Replacement Sequence
Success lies in the details of the sequence. Follow these steps to ensure a leak-free and effective installation:
- Step 1: Shutdown and Depressurize. Unplug the ballast from the wall. Close the water inlet and outlet valves to isolate the UV chamber. Open a nearby faucet to bleed off any remaining pressure; this prevents water from spraying when you open the system.
- Step 2: Access the Lamp. Carefully remove the protective safety cap. Disconnect the lamp power connector by gently pulling it away from the pins. Don’t yank the wires, as this can cause internal shorts.
- Step 3: Removal and Inspection. Slide the old lamp out of the quartz sleeve. This is the perfect time to peek inside. If the sleeve looks cloudy or stained, it needs cleaning or replacement to ensure your new uv water sterilizer bulb replacement actually works.
- Step 4: Installation and Reset. Slide the new lamp into the sleeve, holding it only by the ceramic ends. Reconnect the power plug and replace the safety cap. Once the water is back on and the system is plugged in, hold the “Reset” button on your controller for 5-10 seconds until the display returns to 365.
Once the sequence is complete, your system is officially renewed. You’ve successfully managed a critical piece of home technology, ensuring your water remains a source of life and health rather than a source of worry.
The Hidden Maintenance Factor: Quartz Sleeves and O-Rings
Your new lamp is only as effective as the glass surrounding it. While the uv water sterilizer bulb replacement is the most visible part of maintenance, the quartz sleeve is the silent partner that determines your system’s success. This high-purity glass tube acts as a transparent shield. It keeps the flowing water away from the electrical lamp while allowing germicidal UV-C rays to pass through. If this shield is cloudy, your water remains untreated regardless of how bright your bulb glows.
Homeowners in Tabernacle and Medford Lakes often face high levels of iron and manganese in their well water. These minerals create a “tanning” effect on the quartz. Over time, the heat from the lamp bakes these minerals onto the glass, creating a stubborn, tea-colored film. This bio-fouling is the primary cause of system failure in South Jersey. If the light can’t penetrate the film, the bacteria won’t die. You deserve a system that offers total protection, which means you must look beyond the bulb itself.
Cleaning the Quartz Sleeve
During every uv water sterilizer bulb replacement, you should remove and inspect the sleeve. If you see mineral haze, use a mild acid like vinegar or a specialized scale remover to dissolve the buildup. The “Transparency Test” is your best guide: if you can’t see through the glass clearly, the UV light can’t either. If the glass appears etched, purple, or if the stains don’t budge after a thorough soaking in citric acid, it’s time for a replacement. A fresh sleeve ensures that 100% of the germicidal energy reaches your water supply.
O-Ring Lubrication and Replacement
O-rings are the small, rubber heroes that prevent catastrophic leaks. These seals undergo intense pressure and heat, causing them to flatten and lose their elasticity over time. You should never reuse old O-rings during a maintenance cycle. Always install fresh ones and apply a thin layer of food-grade silicone lubricant. This ensures a watertight seal and makes the next maintenance cycle much easier. If you notice even a tiny drip after reassembly, shut the system down immediately. A small leak can quickly travel up the lamp wires and ruin your expensive electronic ballast.
Managing these delicate components requires a steady hand and a bit of patience. If you’re uncomfortable handling the fragile quartz or want to ensure your seals are perfect, you can book a professional UV maintenance visit to handle the heavy lifting for you.
Professional UV Maintenance in South Jersey: Why Expertise Matters
Your home’s water safety is a continuous journey, not a one-time event. While a DIY uv water sterilizer bulb replacement is possible, there’s a distinct advantage to having a local expert handle the nuances of South Jersey well water. A Clear Alternative has served Medford Lakes and Shamong since 1991. We don’t just swap a bulb. We perform a comprehensive system audit that ensures every component of your ultraviolet sterilizer is functioning at peak efficiency. This professional touch transforms a technical chore into a guarantee of your family’s well-being.
A professional visit includes verifying the ballast voltage and checking sensor accuracy. These electronic components can drift over time, leading to false alarms or a silent failure where the bulb is lit but the intensity is too low. We also provide 24/7 emergency support. If your UV controller starts screaming at 2 AM on a Saturday, you aren’t left guessing if your water is safe to drink. Modern living is about choosing where to spend your energy, and letting an expert handle your water quality provides a level of security that a manual simply can’t offer.
Why DIY Isn’t Always the Best Option
The most common disaster we see is a shattered quartz sleeve. These tubes are incredibly fragile. If they’re stuck due to mineral buildup, applying even a little too much pressure can cause them to snap inside the stainless steel chamber. This turns a simple maintenance task into a costly repair. Our technicians also perform a professional sanitization flush after every uv water sterilizer bulb replacement. This kills any bacteria that may have entered the plumbing during the service, ensuring your taps are safe from the very first drop.
Schedule Your Annual UV Tune-Up
The best way to stay ahead of water quality issues is to combine your maintenance with regular well water testing. This verifies that your bacteria count is truly zero and that your pre-filtration systems are doing their job. You can even join a recurring maintenance plan so you never have to remember a bulb date again. We handle the scheduling, the parts, and the testing. Contact A Clear Alternative today for expert water conditioning services and reclaim the confidence you deserve in your home’s water supply.
Take Control of Your Home’s Water Purity
Maintaining your UV system is about more than just silencing a beep; it’s about protecting the people you love. We’ve explored why the 9,000-hour rule is a non-negotiable safety standard and how a pristine quartz sleeve ensures every drop of water is truly sterilized. By staying ahead of your uv water sterilizer bulb replacement, you eliminate the uncertainty that often comes with well water. You’ve seen how simple the process can be, but you also know when the precision of an expert is the smarter choice for your peace of mind.
Since 1991, our family-owned team has helped homeowners across the Tri-State area achieve crystal-clear results. Whether you need a routine tune-up or 24/7 emergency water support, we’re here to ensure your technology works flawlessly. Don’t wait for a failed water test to take action. Schedule Your UV System Maintenance with A Clear Alternative Today and enjoy the confidence of a home that’s truly protected. You’ve done the research; now let’s make your water safety effortless.
Frequently Asked Questions
Can I touch the UV bulb with my bare hands during replacement?
No, you should never touch the glass with bare hands. The natural oils on your skin create “hot spots” on the quartz. When the bulb reaches its operating temperature, these oils etch the glass and cause it to become brittle. This significantly shortens the lifespan of your uv water sterilizer bulb replacement and can lead to premature failure. Always wear clean nitrile or latex gloves during the installation process to keep the glass pristine.
My UV light is still blue; do I really need to change the bulb?
Yes, you still need to replace it. The blue glow is just a visible byproduct of the mercury arc; it isn’t the invisible UV-C light that actually kills bacteria. After 9,000 hours, the bulb’s ability to produce germicidal wavelengths drops below the effective threshold. Even if it looks bright, it’s no longer providing the 99.9% disinfection rate your family needs to stay safe from well water pathogens.
What happens if I don’t change my UV water sterilizer bulb every year?
Skipping your annual uv water sterilizer bulb replacement puts your family at risk for waterborne illnesses. As the lamp ages, its germicidal intensity fades. This allows resilient microorganisms like E. coli or Giardia to pass through your system completely unharmed. You might not notice a change in taste or smell, but your water is no longer sterilized. Regular maintenance is the only way to guarantee your system meets safety standards.
Is it safe to look at the UV light for just a second to see if it’s on?
No, it’s never safe to look at a lit UV lamp. UV-C radiation is much more intense than sunlight and can cause immediate, permanent damage to your retinas. It can also cause a painful condition called photokeratitis, which feels like having sand rubbed into your eyes. Always unplug the system and wait for the lamp to cool before performing any maintenance. Your vision is far too valuable to risk for a quick check.
How do I reset the alarm on my UV sterilizer after a bulb change?
Most modern UV controllers require you to hold the Reset button for 5 to 10 seconds. You should hear a long beep or see the display return to 365 days. If your system uses a specific brand, you might need to hold the button while plugging the ballast back into the wall. Always check your specific model’s manual to ensure the timer is tracking the new lamp’s lifespan accurately and providing proper protection.
Should I turn off my UV system if I’m not using water for a week?
You should leave your UV system running even if you’re away for a week. Turning it off allows bacteria to grow and colonize the water inside the chamber. When you turn it back on, that slug of untreated water moves directly into your home’s pipes. If you do turn it off, you must perform a full plumbing sanitization when you return. Continuous operation is the safest way to maintain a sterile environment.
Does a UV sterilizer remove lead or chemicals from my well water?
No, a UV sterilizer is designed specifically to neutralize biological threats like viruses and bacteria. It doesn’t have the physical properties to remove lead, arsenic, PFAS, or other chemical contaminants. To address heavy metals or chemicals in your well water, you’ll need to pair your UV system with a reverse osmosis system or a carbon filtration unit. We recommend a comprehensive water test to identify any non-biological issues in your supply.
Why is my UV lamp flickering or making a buzzing sound?
A flickering lamp or a buzzing ballast usually indicates an electrical failure. This could be caused by a loose connection, a failing lamp filament, or an aging electronic ballast. If your bulb is nearing the end of its 12 month life, it’s likely the lamp itself. However, if a new bulb doesn’t fix the issue, the ballast might have been damaged by a power surge. It’s best to have a professional inspect the electronic components.